一、概述
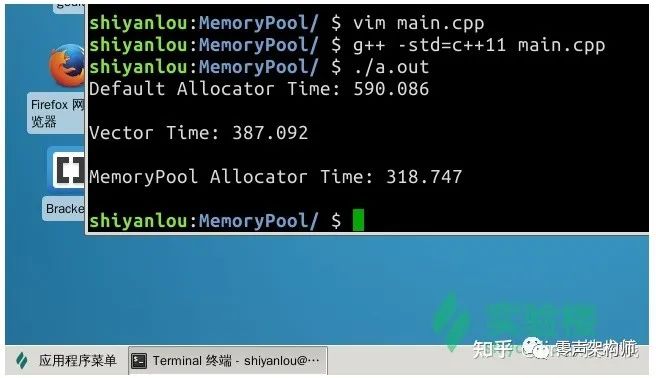
在 C/C++ 中,内存管理是一个非常棘手的问题,我们在编写一个程序的时候几乎不可避免的要遇到内存的分配逻辑,这时候随之而来的有这样一些问题:是否有足够的内存可供分配?分配失败了怎么办? 如何管理自身的内存使用情况? 等等一系列问题。在一个高可用的软件中,如果我们仅仅单纯的向操作系统去申请内存,当出现内存不足时就退出软件,是明显不合理的。正确的思路应该是在内存不足的时,考虑如何管理并优化自身已经使用的内存,这样才能使得软件变得更加可用。本次项目我们将实现一个内存池,并使用一个栈结构来测试我们的内存池提供的分配性能。最终,我们要实现的内存池在栈结构中的性能,要远高于使用 std::allocator 和 std::vector,如下图所示:
项目涉及的知识点
C++ 中的内存分配器 std::allocator
内存池技术
手动实现模板链式栈
链式栈和列表栈的性能比较
内存池简介
内存池是池化技术中的一种形式。通常我们在编写程序的时候回使用 new delete 这些关键字来向操作系统申请内存,而这样造成的后果就是每次申请内存和释放内存的时候,都需要和操作系统的系统调用打交道,从堆中分配所需的内存。如果这样的操作太过频繁,就会找成大量的内存碎片进而降低内存的分配性能,甚至出现内存分配失败的情况。
而内存池就是为了解决这个问题而产生的一种技术。从内存分配的概念上看,内存申请无非就是向内存分配方索要一个指针,当向操作系统申请内存时,
操作系统需要进行复杂的内存管理调度之后,才能正确的分配出一个相应的指针。而这个分配的过程中,我们还面临着分配失败的风险。
所以,每一次进行内存分配,就会消耗一次分配内存的时间,设这个时间为 T,那么进行 n 次分配总共消耗的时间就是 nT;如果我们一开始就确定好我们可能需要多少内存,那么在最初的时候就分配好这样的一块内存区域,当我们需要内存的时候,直接从这块已经分配好的内存中使用即可,那么总共需要的分配时间仅仅只有 T。当 n 越大时,节约的时间就越多。
二、主函数设计
我们要设计实现一个高性能的内存池,那么自然避免不了需要对比已有的内存,而比较内存池对内存的分配性能,就需要实现一个需要对内存进行动态分配的结构(比如:链表栈),为此,可以写出如下的代码:
#include
// std::cout, std::endl#include
// assert()#include
// clock()#include
// std::vector
#include "MemoryPool.hpp" // MemoryPool
#include "StackAlloc.hpp" // StackAlloc
,>
// 插入元素个数#define ELEMS 10000000// 重复次数#define REPS 100
int main(){ clock_t start;
// 使用 STL 默认分配器 StackAlloc
// 使用内存池 StackAlloc
return 0;}
在上面的两段代码中,StackAlloc 是一个链表栈,接受两个模板参数,第一个参数是栈中的元素类型,第二个参数就是栈使用的内存分配器。
因此,这个内存分配器的模板参数就是整个比较过程中唯一的变量,使用默认分配器的模板参数为 std::allocator,而使用内存池的模板参数为 MemoryPool。
std::allocator 是 C++标准库中提供的默认分配器,他的特点就在于我们在 使用 new 来申请内存构造新对象的时候,势必要调用类对象的默认构造函数,而使用 std::allocator 则可以将内存分配和对象的构造这两部分逻辑给分离开来,使得分配的内存是原始、未构造的。
下面我们来实现这个链表栈。
三、模板链表栈栈的结构非常的简单,没有什么复杂的逻辑操作,其成员函数只需要考虑两个基本的操作:入栈、出栈。为了操作上的方便,我们可能还需要这样一些方法:判断栈是否空、清空栈、获得栈顶元素。
// 默认构造 StackAlloc() { head_ = 0; } // 默认析构 ~StackAlloc() { clear(); }
// 当栈中元素为空时返回 true bool empty() {return (head_ == 0);}
// 释放栈中元素的所有内存 void clear();
// 压栈 void push(T element);
// 出栈 T pop();
// 返回栈顶元素 T top() { return (head_->data); }
private: // allocator allocator_; // 栈顶 Node* head_;};
简单的逻辑诸如构造、析构、判断栈是否空、返回栈顶元素的逻辑都非常简单,直接在上面的定义中实现了,下面我们来实现 clear(), push() 和 pop() 这三个重要的逻辑:
// 入栈操作 newNode->data = element; newNode->prev = head_; head_ = newNode;}
// 出栈T pop() { // 出栈操作 返回出栈元素 T result = head_->data; Node* tmp = head_->prev; allocator_.destroy(head_); allocator_.deallocate(head_, 1); head_ = tmp; return result;}
至此,我们完成了整个模板链表栈,现在我们可以先注释掉 main() 函数中使用内存池部分的代码来测试这个连表栈的内存分配情况,我们就能够得到这样的结果:
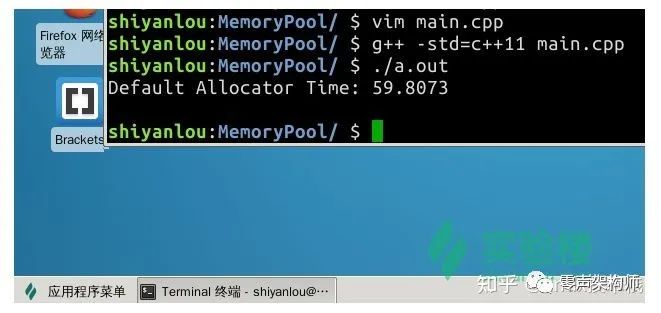
在使用 std::allocator 的默认内存分配器中,在
#define ELEMS 10000000#define REPS 100
的条件下,总共花费了近一分钟的时间。
如果觉得花费的时间较长,不愿等待,则你尝试可以减小这两个值
总结本节我们实现了一个用于测试性能比较的模板链表栈,目前的代码如下。在下一节中,我们开始详细实现我们的高性能内存池。
#ifndef STACK_ALLOC_H#define STACK_ALLOC_H
#include
template
// T 为存储的对象类型, Alloc 为使用的分配器,// 并默认使用 std::allocator 作为对象的分配器template
// 默认构造 StackAlloc() { head_ = 0; } // 默认析构 ~StackAlloc() { clear(); }
// 当栈中元素为空时返回 true bool empty() {return (head_ == 0);}
// 释放栈中元素的所有内存 void clear() { Node* curr = head_; while (curr != 0) { Node* tmp = curr->prev; allocator_.destroy(curr); allocator_.deallocate(curr, 1); curr = tmp; } head_ = 0; }
// 入栈 void push(T element) { // 为一个节点分配内存 Node* newNode = allocator_.allocate(1); // 调用节点的构造函数 allocator_.construct(newNode, Node());
// 入栈操作 newNode->data = element; newNode->prev = head_; head_ = newNode; }
// 出栈 T pop() { // 出栈操作 返回出栈结果 T result = head_->data; Node* tmp = head_->prev; allocator_.destroy(head_); allocator_.deallocate(head_, 1); head_ = tmp; return result; }
// 返回栈顶元素 T top() { return (head_->data); }
private: allocator allocator_; Node* head_;};
#endif // STACK_ALLOC_H
// main.cpp
// #include "MemoryPool.hpp"#include "StackAlloc.hpp"
// 根据电脑性能调整这些值// 插入元素个数#define ELEMS 25000000// 重复次数#define REPS 50
int main(){ clock_t start;
// 使用默认分配器 StackAlloc
// 使用内存池 // StackAlloc> stackPool;,> // start = clock(); // for (int j = 0; j < REPS; j++) { // assert(stackPool.empty()); // for (int i = 0; i < ELEMS; i++) // stackPool.push(i); // for (int i = 0; i < ELEMS; i++) // stackPool.pop(); // } // std::cout <<> // std::cout <<>
return 0;}
二、设计内存池
在上一节实验中,我们在模板链表栈中使用了默认构造器来管理栈操作中的元素内存,一共涉及到了 rebind::other, allocate(), dealocate(), construct(), destroy()这些关键性的接口。所以为了让代码直接可用,我们同样应该在内存池中设计同样的接口:
#ifndef MEMORY_POOL_HPP#define MEMORY_POOL_HPP
template
// 定义 rebind::other 接口 template
// 默认构造, 初始化所有的槽指针 // C++11 使用了 noexcept 来显式的声明此函数不会抛出异常 MemoryPool() noexcept { currentBlock_ = nullptr; currentSlot_ = nullptr; lastSlot_ = nullptr; freeSlots_ = nullptr; }
// 销毁一个现有的内存池 ~MemoryPool() noexcept;
// 同一时间只能分配一个对象, n 和 hint 会被忽略 pointer allocate(size_t n = 1, const T* hint = 0);
// 销毁指针 p 指向的内存区块 void deallocate(pointer p, size_t n = 1);
// 调用构造函数 template
// 销毁内存池中的对象, 即调用对象的析构函数 template
private: // 用于存储内存池中的对象槽, // 要么被实例化为一个存放对象的槽, // 要么被实例化为一个指向存放对象槽的槽指针 union Slot_ { T element; Slot_* next; };
// 数据指针 typedef char* data_pointer_; // 对象槽 typedef Slot_ slot_type_; // 对象槽指针 typedef Slot_* slot_pointer_;
// 指向当前内存区块 slot_pointer_ currentBlock_; // 指向当前内存区块的一个对象槽 slot_pointer_ currentSlot_; // 指向当前内存区块的最后一个对象槽 slot_pointer_ lastSlot_; // 指向当前内存区块中的空闲对象槽 slot_pointer_ freeSlots_;
// 检查定义的内存池大小是否过小 static_assert(BlockSize >= 2 * sizeof(slot_type_), "BlockSize too small.");};
#endif // MEMORY_POOL_HPP
在上面的类设计中可以看到,在这个内存池中,其实是使用链表来管理整个内存池的内存区块的。内存池首先会定义固定大小的基本内存区块(Block),然后在其中定义了一个可以实例化为存放对象内存槽的对象槽(Slot_)和对象槽指针的一个联合。然后在区块中,定义了四个关键性质的指针,它们的作用分别是:
currentBlock_: 指向当前内存区块的指针
currentSlot_: 指向当前内存区块中的对象槽
lastSlot_: 指向当前内存区块中的最后一个对象槽
freeSlots_: 指向当前内存区块中所有空闲的对象槽
梳理好整个内存池的设计结构之后,我们就可以开始实现关键性的逻辑了。
三、实现MemoryPool::construct() 实现
MemoryPool::construct() 的逻辑是最简单的,我们需要实现的,仅仅只是调用信件对象的构造函数即可,因此:
MemoryPool::deallocate() 实现
MemoryPool::deallocate() 是在对象槽中的对象被析构后才会被调用的,主要目的是销毁内存槽。其逻辑也不复杂:
MemoryPool::~MemoryPool() 实现
析构函数负责销毁整个内存池,因此我们需要逐个删除掉最初向操作系统申请的内存块:
MemoryPool::allocate() 实现
MemoryPool::allocate() 毫无疑问是整个内存池的关键所在,但实际上理清了整个内存池的设计之后,其实现并不复杂。具体实现如下:
四、与 std::vector 的性能对比
我们知道,对于栈来说,链栈其实并不是最好的实现方式,因为这种结构的栈不可避免的会涉及到指针相关的操作,同时,还会消耗一定量的空间来存放节点之间的指针。事实上,我们可以使用 std::vector 中的 push_back() 和 pop_back() 这两个操作来模拟一个栈,我们不妨来对比一下这个 std::vector 与我们所实现的内存池在性能上谁高谁低,我们在 主函数中加入如下代码:
这时候,我们重新编译代码,就能够看出这里面的差距了:
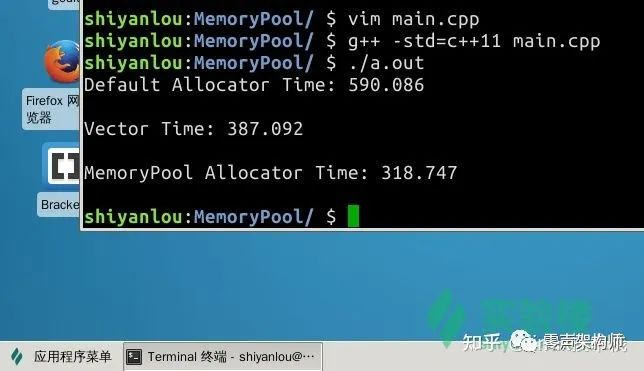
首先是使用默认分配器的链表栈速度最慢,其次是使用 std::vector 模拟的栈结构,在链表栈的基础上大幅度削减了时间。
std::vector 的实现方式其实和内存池较为类似,在 std::vector 空间不够用时,会抛弃现在的内存区域重新申请一块更大的区域,并将现在内存区域中的数据整体拷贝一份到新区域中。
最后,对于我们实现的内存池,消耗的时间最少,即内存分配性能最佳,完成了本项目。
总结
本节中,我们实现了我们上节实验中未实现的内存池,完成了整个项目的目标。 这个内存池不仅精简而且高效,整个内存池的完整代码如下:
#include#include
template
// 定义 rebind::other 接口 template
// 默认构造 // C++11 使用了 noexcept 来显式的声明此函数不会抛出异常 MemoryPool() noexcept { currentBlock_ = nullptr; currentSlot_ = nullptr; lastSlot_ = nullptr; freeSlots_ = nullptr; }
// 销毁一个现有的内存池 ~MemoryPool() noexcept { // 循环销毁内存池中分配的内存区块 slot_pointer_ curr = currentBlock_; while (curr != nullptr) { slot_pointer_ prev = curr->next; operator delete(reinterpret_cast
// 同一时间只能分配一个对象, n 和 hint 会被忽略 pointer allocate(size_t n = 1, const T* hint = 0) { if (freeSlots_ != nullptr) { pointer result = reinterpret_cast(freeSlots_); freeSlots_ = freeSlots_->next; return result; } else { if (currentSlot_ >= lastSlot_) { // 分配一个内存区块 data_pointer_ newBlock = reinterpret_cast(operator new(BlockSize)); reinterpret_cast(newBlock)->next = currentBlock_; currentBlock_ = reinterpret_cast(newBlock); data_pointer_ body = newBlock + sizeof(slot_pointer_); uintptr_t result = reinterpret_cast
// 销毁指针 p 指向的内存区块 void deallocate(pointer p, size_t n = 1) { if (p != nullptr) { reinterpret_cast(p)->next = freeSlots_; freeSlots_ = reinterpret_cast(p); } }
// 调用构造函数, 使用 std::forward 转发变参模板 template
// 销毁内存池中的对象, 即调用对象的析构函数 template
private: // 用于存储内存池中的对象槽 union Slot_ { T element; Slot_* next; };
// 数据指针 typedef char* data_pointer_; // 对象槽 typedef Slot_ slot_type_; // 对象槽指针 typedef Slot_* slot_pointer_;
// 指向当前内存区块 slot_pointer_ currentBlock_; // 指向当前内存区块的一个对象槽 slot_pointer_ currentSlot_; // 指向当前内存区块的最后一个对象槽 slot_pointer_ lastSlot_; // 指向当前内存区块中的空闲对象槽 slot_pointer_ freeSlots_; // 检查定义的内存池大小是否过小 static_assert(BlockSize >= 2 * sizeof(slot_type_), "BlockSize too small.");};
#endif // MEMORY_POOL_HPP

 扫码关注
扫码关注







![电子设计:应用FFT分析信号频谱[学以致用系列课程之数字信号处理]](https://api.fanyedu.com/uploads/image/a2/10b5f3f27a2c472f012fe993abdb10.png)


